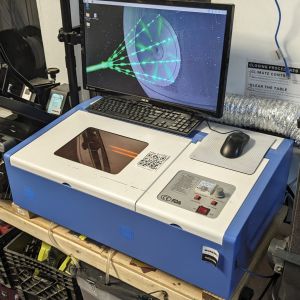
K40 Laser Cutter

The K40 Laser cutter is located towards the back of the space & connected to a monitor & raspberry pi.
Specficiations
- 40W Co2 Laser
- 18mm Lens (w/12mm adapter)
Safety
The Laser Cutter is Not a Workbench, Public computer, or Shelf
The linear bearing surface is actually quite fragile and easily damaged by denting or abrasion. Check before using whether your material is safe. Do not laze metal object, the reflections will damage the lazor. Do not laser any material that contains chlorine (e.g. PVC, Vinyl)
Safety Glasses On
The window on the lazor is perspex and does not block UV radiation. The laser light is not visible and can cause eye damage if you do not wear appropriate goggles or cover the window.
Complete Shutoff
Towards the back-right end of the laser cutter there's a power extension cord that shuts off all laser-cutter-related devices.
Interlocks
The machine will shut off the laser automatically if either the lid is opened or the coolant flow is interrupted. Be sure the lid is closed and coolant is running before cutting.
Fume Extractor
The fume extraction system is built using a 120mm PC fan and a 3D printed shroud. To turn on the fan, locate the power supply attached to it, this should be near the vent at the window, and make sure the switch is in the position closest to the barrel jack.
Water Cooling System
The distilled water cooling loop should be running at all times the laser cutter is on or active, make sure the water is flowing into and out of the reservior.
Using
Raspberry Pi
The Pi is located behind the laser cutter and connected to the wall-mounted monitor. A USB type-A extension is plugged in to facilitate connecting a flash drive to transfer files onto the Pi.
The login credentials for the pi are the raspbian defaults, user:pi password:raspberry
Create SVG
Inkscape is installed by default, open it from the desktop or menu to prepare the SVG file. To set the dimensions of your file, go to the Document properties and change the size units to be centimeters, inches, or millimeters depending on how you want to measure your piece. Make sure your picture or design elements fill the entire artboard, otherwise the laser will cut too large or too small. Select export to Plain SVG to create the SVG file. The color of the lines and/or shapes in the SVG will determine the speed of the laser as it cuts and/or engraves the material. Multiple colors in the same file allows the software to cut, raster-engrave, or vector-engrave shapes without needing separate files for each type of operation.
hex #000000(Black) will raster-engrave by going back and forth across an image, printing it out line by line, quickly. (Default 100mm/s)hex #0000FF(Blue) will vector-engrave, tracing the exact shape of the lines, slowly. (Default 20mm/s)hex #FF0000(Red) will cut, tracing the exact shape of the lines, extra-slowly. (Default 10mm/s)
There is a folder on the desktop containing existing SVGs.
Cut
- From the desktop, run the app
K40 Whisperer, confirm withExecuteif prompted. - Import the SVG from the
Filemenu item. - Press the
Initialize Laser Cutterbutton to calibrate into starting position, that top-right corner is the x0 & y0 of the laser. - The arrows & step size field above them allow for moving the starting position along with the corresponding imported SVG into position.
- Flip the switch to on, press the leftmost red button to turn on the laser, and ensure that the lid is closed.
- Start the job by pressing one of 3 buttons on K40 whisperer. Raster engrave is used for engraving raster images such as pictures. Vector engrave is for engraving line-based work such as geometric shapes. Vector cut is also a line-based operation but as the name suggests, sets the K40 up to cut.
- When done, flip the red switch again to turn off the laser cutter (important).